

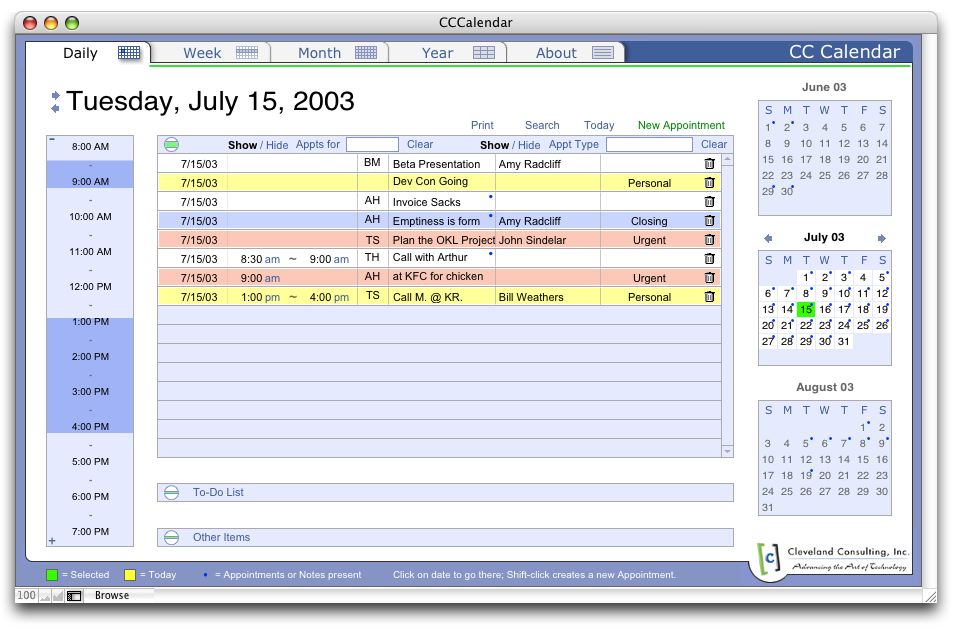
You can easily modify the calendar to link calendar appointments with contacts or clients in your own database. In order to demonstrate this, the following example links CC Calendar with the free "Contact Manager" solution from FileMaker's web site.
This example makes the modifications in the Pro Calendar, though these instructions apply to any calendar version. (This wouldn't apply to the Scheduling Edition, where appointments are already linked to Clients.)
The Modification.
You'll want to begin by downloading the Contact Manager from FMI's web site or you can follow along with your own file. FMI's solution comes without any records, so you'll want to add a few sample names to it before you get started.
1. Backup Your Files. This modification is a piece of cake, but why tempt fate.
2. Getting Started. Begin by placing your contacts or client's file in the same folder as CCCalendar.fp7 Open both CCCalendar and your contatcts or clients file (Contact Management.fp7 in this example).
3. Define a File Reference. In CCCalendar select Define / File References from the FileMaker File Menu. Click "New" in the lower left and then click "add file" in the top right of the next screen. You'll be prompted to selet a file, pick Contact Management.fp7. Your file reference should now read "file:Contact Management.fp7" Click "OK" in the lower right.
4. Adding a Link in the Appointments Table. We need to create a place to record who each appointment is for; we do this by storing the contact's or client's ID Number in the appointment. Select File / Define / Database from the FileMaker File Menu and click on the "tables" tab. Double click on the CCCalAppts table- this is the table used to store appointments in CCCalendar. Enter a new field name at the bottom of this screen; call the field "ApptKeyContactIDX" and make its type a number. That's it. Click Create and OK.
5. Adding A Table Occurrence. Select File / Define / Database from the FileMaker File Menu and click on the "Relationships" tab in the resulting window. Here you can see the relationship graph for CC Calendar. Click the "New Table Occurrence" button in the lower left of this screen- this button is not labeled, it just has a little box with a green plus on it- it is the left most button in the bottom row of buttons. In the Specify Table window which comes up, switch the "File" selection away from "Current File..." to "Contact Management", the name of the file reference you created in step 2 above. Select the table which holds you contacts' or clients' info. In our example the Contact Management file has only one table, called "Contact Management". Selecting a table will put a litte box for it (a Table Occurrence) on your graph.
6. Adding a relationship. Our goal is to be able to see our clients' information when we are on the daily view AND when we edit appointments from any other view. Fortunately, the appointments on the Daily View and the Mini Window layout in which we edit appointments are based on the same Table Occurrence (TO) in the relationship graph in CCCalendar. So, that is the only TO we need to relate things to.
To start the relationship, draw a line from any field in the AppointmentsDaily TO to your new Contact Management TO. That will establish a quick relationship between the two TOs. Now double click on the line between these TOs to edit the relationship. On the Appointments Daily side, select the field "ApptKeyContactIDX". On the Contact Management side, select the field "Contact ID". Click change to save the changes and OK to leave the dialog. Now all we have to do is add the contact's information to layouts. Click OK to leave the Define Database window.

7. Editing the Daily View Layout. Enter layout mode on the daily view and make some room on the layout by shortening the length of the appointment title field. You'll likely need to unlock this layout object first (select "unlock" from FileMaker's Arrange menu). Next, copy this Appt Title field and paste it to the left of the appointment label field. Position it within the portal row at the same height as the other text fields around it. Double click on the field and change the table occurrence name from "Appointments Daily" to "Contact Management". Once you do, you'll be able to see all the fields from your contact management table; select "Full Name". Now enter browse mode. You won't see anyone's name there yet as we haven't added an interface for assigning a contact to an appointment... we'll do that in the next and final step.
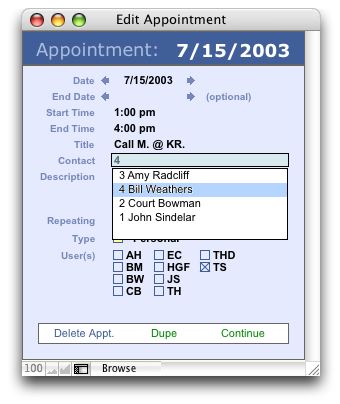
8. Add the Contact to the Edit Appointment Mini Window. Go into layout mode and navigate to the Mini Window Edit Appointment layout. (You'll need to have the status area showing to do this- you can open it by running the "Show Status Area" script step.) We're going to add a place to add a contact to an appointment; to make room for this, shorten the description field and move it down. We'll place our new contact field between the description and the appointment's title. Copy the end time and paste it back in as the beginning of our contact field. Double click on the new field and switch it to the ApptKeyContactIDX field. Highlight the field and select Field Format from the FileMaker format menu; switch the format from Edit Box to Pop-up List. We'll define a pop-up list to present us a list of possible contacts: select "Define Value List..." from the Display Values From menu. Create a new value list called contacts: select "Use Values from Field" and format the value list as shown below...
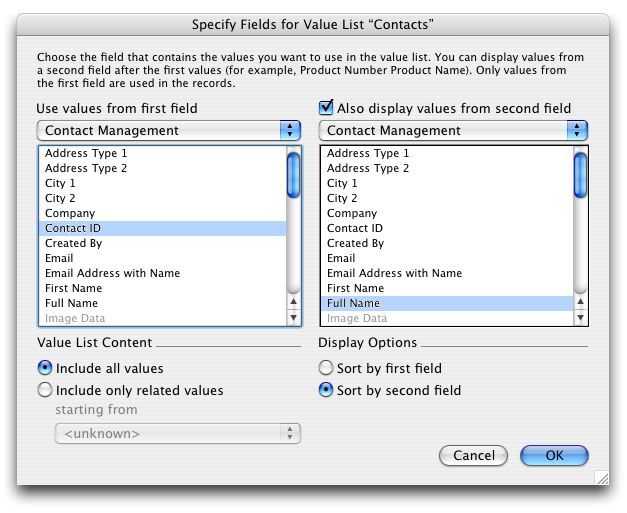
This value list will insert the selected contact's ID into our ApptKeyContactIDX. Now we just need to place a field above this to show the contact's name. Copy the ApptKeyContactIDX field and paste it back on top of itself; double click on the field and in the Specify Field dialog select the Contact Management table occurrence; select the "Full Name" field. You'll want this field to be for show only- actually editing the contact for this appointment will be done in the field below this one, so highlight the full name field again and using the Format / Field Behavior menu, set the field so that it can not be entered in Browse mode or Fine mode. Finally, make this top field the same color as the background of the layout so that you can't see the ID field below it.
(Be sure to change the tab order of the layout so it behaves the way you'd like.)
Notice that using the same steps with which we added the contact's full name, we could add *any* contact information to the layout. Now that we have a relationship to the contact's table we can add anything we need from that file (such as phone numbers or email addresses).
That's it!