The Quick Version
Get up and running in a few minutes
Follow these simple instructions to get going, or read "The Details" below for a more in-depth walkthrough.
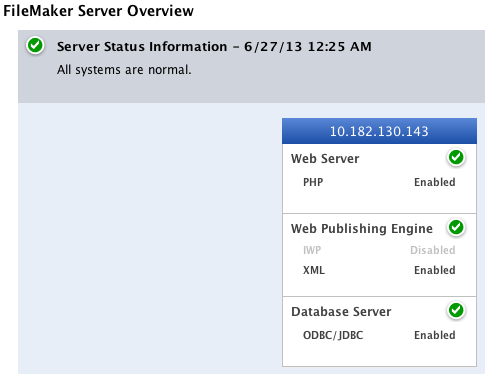
1. Make sure FileMaker Server's Web Publishing is on
SeedCode Subscribe uses FileMaker Server's PHP and XML Web Publishing to give iCal and Google Calendar access to your events. Open the FileMaker Server's Admin Console to double check.
2. Open your hosted FileMaker Database and make a new layout for your calendar events.
Make sure your FileMaker solution is hosted using FileMaker Sever.
Then open your file and make a new layout containing just the fields you need to see in iCal or Google Calendar. At a minimum you need fields for:
The event title
The event start as a timestamp
The event end as a timestamp
Leave your FileMaker file open for step 3 below.
3. Open SeedCode_Subscribe_Setup.fmp12 and Click "New Calendar"
SeedCode_Subscribe_Setup.fmp12 can be hosted on your FileMaker Server or just open on your desktop.
Fill out tab #1 ("Server settings") with the address of your server, the username and password of an account that can see the layout you made above, and then pick the layout.
Continue to use the public engine for now.
If you don't see a green check mark beside any of the configuration options, click one of the refresh buttons or hover over the "?" near that value for more information.
4. Map your Fields
Navigate to tab #2 ("map the fields"), and select the name of your title, event start and event end fields.
5. Test it
Skip all the way to Tab 4, "Results and sharing" and click the "Test the setup" button. You should see your data rendered as an .ics file starting "BEGIN:VCALENDAR".
When you do, hit "Subscribe" at the bottom of the screen and you'll see your events in the calendar on the machine you're using. The events will be watermarked with "****DEMO****" since you're using the demo server.
That's it: you've made your first calendar subscription!
The next steps before you share that subscription URL are to install the seedcode_subscribe_engine on your own FileMaker Server using the instructions below (so you can switch off the public engine), and then to add some
filters so you can see your events as different calendars.
Enjoy!
Installation Details: Three Simple Steps
Overview
Before you get started you may want to watch an intro video featuring a walkthrough of the following steps. Then return here and follow these instructions.
SeedCode Subscribe installs vey easily and soon you'll be creating ical/Google calendar subscriptions to your FileMaker data.
Step 1: Make sure FileMaker Server has Web Publishing running
PHP is installed as part of FileMaker Server's Web Publishing
You'll want both Web Publishing and PHP enabled in your FileMaker Server for SeedCode Subscribe to work. PHP installs as part of the normal install of FileMaker Server's "Web Publishing" component, but you may not have instaled web publishing when you first installed the FileMaker Sever app.
You can see if Web Publishing is installed and PHP is running by looking at the FileMaker Server admin console at
http://<yourserver.com>:16000...
If you don't see the green check marks above, you'll want to install the we publishing component of FileMaker Server. For help installing and configuring FileMaker Server, visit
FileMaker's support pages.
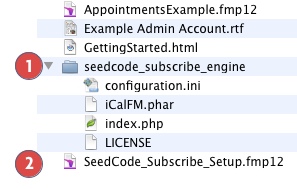
Step 2: Place the "seedcode_subscribe_engine" folder on your FileMaker Server
Overview: Where to put the files
There are three parts to a SeedCode Subscribe deployment:
1. The "seedcode_subscribe_engine" folder, which you'll place on your FileMaker Server in the web root (instructions below).
2. The setup file (SeedCode_Subscribe_Setup.fmp12) you'll use to setup new calendars and build the subscription URLs. This can be on your desktop or hosted on your FileMaker sever.
3. Your hosted database. Which is likely already hosted on your FileMaker Server.
Also included in the SeedCode Subscribe download is a sample database called AppointmentsExample.fmp12, so you can see some examples of how SeedCode Subscribe is wired up. To use this file, host it on your FileMaker Server.
Putting "seedcode_subscribe_engine" on your FileMaker Server
Put the "seedcode_subscribe_engine" folder (containing 4 files) in the web root folder on your FileMaker Server. This location is different depending on whether you are using FMS 12 or FMS 13. Find the appropriate default web root for your setup below.
Mac OS
Library/WebServer/Documents
Mountain Lion Server
Library/Server/Web/Data/Sites/Default
Windows
c:inetpub/wwwroot
FileMaker Server 13/14/15
Mac OS, through HTTP
Library/FileMaker Server/HTTPServer/htdocs/
Mac OS, through HTTPS
Library/FileMaker Server/HTTPServer/htdocs/httpsRoot/
Windows
C:\Program Files\FileMaker\FileMaker Server\HTTPServer/conf/
NOTE that the "seedcode_subscribe_engine" folder is not included in the demo version. With the demo version, you must use our demo server for your testing, which adds a "***DEMO***" watermark to your events.
You can also install the "seedcode_subscribe_engine" folder on a separate machine. Learn more about that here:
remote PHP deployments.
Step 3: (optional) Host the setup file on your FileMaker Server
This is really only needed if you're working with Google Calendar and can be done once you've tested things in iCal
The SeedCode_Subscribe_Setup.fmp12 file is where you set up and publish new calendars. It does
not need to be hosted on a server unless you are publishing any calendars using the "private link" (usually for Google Calendar users). See the
Google Calendar page for more info.
Next Steps: Configure a Calendar